Thursday, June 7, 2012

The Beauty of Solar Shades

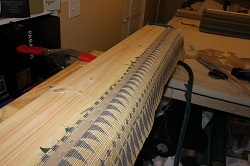
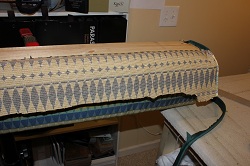
I like the look of Solar Shades.  They are pretty and functional.  These were installed a few weeks ago in a newly remodeled kitchen. 

The headers on these shades are encased in a cassette.  It gives them some weight at the top without being too cumbersome.  I like this look so much more than the typical detachable valance that usually comes with a wood blind.  And when they are fully raised, the blind disappears into the cassette, so the stack-up is nice and tight.
Because there are young children in this household, it was important for my client to be able to see outside even when the shades are down.  This picture shows the opacity of the shades.  As you can see, it was a sunny day when these were taken, but there is little to no sun coming in.  In this way, the furniture is as well protected as the kids!


Wednesday, June 6, 2012

     I started sewing when I was about 12 years old.  My first creation was a skirt.  I remember spending lots of time trying to get that darn zipper in just right.  Next, I entered a 4-H (does that even still exist?) contest where I tried a skirt with a matching vest.  It was pink - kind of a Pepto Bismol color.  Man, was I proud of that creation!  I took it to the Madison County Fair, and won a ribbon, if I remember correctly.  Okay, it was honorable mention, but I was proud of it none-the-less.   I wish I still had the picture of myself wearing that crazy outfit with my buck teeth and shag haircut.
    When I was a teenager, my favorite store to go to was Faye's Fabrics in Richmond Ky.  I loved looking at all the fabrics, patterns, and especially the buttons. I loved pouring over  the new pattern books that came out seasonally, and picking out just the right fabric for the pattern.  Occasionally, Faye would give me her outdated pattern book to take home and look through.  That was more fun for me than any Seventeen Magizine ever could be.  Hours and hours of my growing-up years were spent on the floor of my mother's dining room cutting out a new pattern, and seaming it together using her sewing machine.   When I was first learning to sew, I would seam two pieces together, then take it to her for inspection.  She was usually in the family room in her favorite chair grading papers.  (She was a teacher)  Many is the time that I had to take out a row of stitching, and redo it so that it was up to her standards. 
     In college, I made several dresses for myself and for friends.  That was my first taste of being paid for what I love to do.  My graduation present from college was my own sewing machine!  What a different time we live in now.....
     My business that I love so much, Sycamore Creek Interiors, was born out of those early years of sewing.  So much of what I learned back then, I use every time I have a sewing project.  Things like pressing open a seam to make it lay better, and adding an inch to the finished size of a pillow to account for the seam allowance.
     I've been thinking for a while that it is such a shame that the art of sewing for your family has all but died out.  Not many people know how to make a skirt for themselves anymore, much less anything pretty for their home.  It's so easy to buy the clothing we need from our favorite online sight or store.  But a hand-made gift for a new baby, or a special Easter dress for a child, or some new pillows for your living room that just match your window treatments is a special thing, and something I wish I could pass down to the next generation. 

Monday, June 4, 2012

Today's project involved combining several techniques that I had not done before......I paired a simple cornice with an inverted pleat valance.  I think it turned out pretty well!  This was also a chance for me to play with the settings on my camera, and pretty each picture up when necessary using Photoshop.

Step 1: The wood frame was already constructed by my client.  I wrapped it with Cornice padding.


Step 2:  The Cornice was covered with the face fabric supplied by my client.


Step 3:  Contrasting cording was added to the top and bottom.


Step 4: The top of the cornice was covered with a coordinating fabric.  This gives a nice finished top,  in case the cornice can be seen from the top. 


Step 5.  The face fabric, pleat fabric and lining fabric for the inverted pleat valance was cut and measured to create the pleats.


Step 6.  The fabric was seamed and and pleated together.  Then, the lining was attached.

Step 7.  The inverted pleat shape was temporarily folded into place just to check pattern placement.
Step 8.  The inverted pleat valance was then attached to the cornice.


Step 9.  Lining was added to the back of the cornice.  It's important that the front of the treatment looks as good as the back.


Step 10.  The finished treatment is inspected, packaged, and is ready for delivery to the client's home.


Monday, January 16, 2012

Happy 2012!


Just finished up my first job of 2012.....beautiful flat roman shades in a plaid silk.  These went in a dining room that had existing panels in the same silk.  Just the finishing touch for this homeowner's windows.

Thursday, September 8, 2011

     As a business owner in the window treatment and design industry, I think it's important to belong to associations the specialize in the education and promotion of  professional window treatment designers.  This allows me to network with my peers, stay current on color and design trends, and make sure the products I sell are up to code when it comes to safety.  Because of this, I am a member of two groups - KWA which stands for the Kentucky Workroom Association, and WCAA  which stands for Window Coverings Association of America.     
     This week, I've been attending the WCAA 2011 Inspire conference.  The conference, located at the Galt House in downtown Louisville, brings together business owners and window treatment vendors from all over the United States and Canada.  It's a place to learn what's new in the industry, meet other designers and workroom professionals, and check out the best that our vendors have to offer.  I've met one designer, Lee,  who is attending from Oakland, California with her husband.  Another designer that I sat with at lunch today is from Delaware.  She's here by herself, so we were able to get to know each other a bit.  Since we each attended different seminars in the morning sessions, we compared notes on what we had learned.  She spent the morning in drapery fabrication classes - I spent my time in marketing classes.  My most interesting contact came from my new friend from Bowling Green.  Her business is a little farther along than mine, and we made plans for me to stop by her business next time I'm in town.  We have daughter's that attend the same college, so we had something in common instantly other than draperies.
      I'm sure the highlight for all of us in attendance today was the keynote speaker for our lunch, Sarah Richardson from HGTV's "Sarah's House".  Sarah spoke about her design philosophy, and shared several funny stories about challenging rooms and clients.  She was very down-to-earth, and even let all of us take pictures with her after her presentation. 
    Tomorrow, I'm taking a class on challenging windows, then spending the afternoon on the vendor floor checking out what's new.  And I'm most excited about getting my scissors sharpened for free!  (I know, this makes no sense to most of you, but if you spent as much time with a pair of scissors in your hand as I do, you'd understand how important it is to have them well-sharpened)

Wednesday, April 6, 2011

A Cornice Window Treatment


My customer knew she wanted a cornice for her newly painted dining room. The only other decisions to make were the style of the bottom cutout and the fabric to use. The style we chose has a center point which I think works well on a double window. The customer suggested we change the style a bit by making the side pieces longer than the pattern specified. In picking out the fabric for the cornice, we took into account the fact that the room is painted a beautiful shade of red (my favorite color!), and she has a navy leather sofa in the adjacent great room, and touches of red, blue, and gold in her kitchen. We picked this large-scale print from Carole fabrics because of the colors that were incorporated into it, and the scale of the print. This particular print is called Laurie and the color is Sapphire.

Friday, April 1, 2011

What will this really look like?


So often, clients will say to me "I just can't quite imagine what this is going to look like". They worry that the fabric we've chosen won't work in the room, or that the design won't compliment the rest of the house the way they had hoped. But now, with the help of Dream Draper, a software program developed by Evan Marsh Design, I can take a picture of their blank window, upload it to my computer, and choose from hundreds of design and fabric options to show the client a pretty close rendering of what the finished product will be. Each design can be sized to fit the client's window, and colored in with the fabric of their choice. We can make changes to a design - raise or lower long and short points, change fabrics or detailing, or tweak in any number of other ways. We can also help with the layout of your room with a feature called "Space Planning". We can even paint your room "virtually", so you can see how your room could change with a different color on the walls.
Welcome Home

Followers