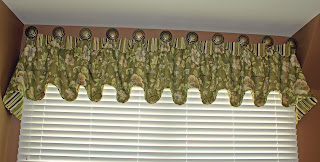
These are two windows that were recently done using cuff-top treatments. It has a casual but polished look. The smaller window is in a mudroom. We decided to use dark medallions for the hardware because my customer had dark hardware on the doors in the room. I also think this works well with the contrast of the lighter paisley fabric. In the bedroom application, the feel was more tone-on-tone, which meant the hardware needed to be lighter in color. Because of the wood tones of the furniture in the room, and the neutral color on the walls, we wanted the color in the pillows and window treatments to be the focal point. I also like that we chose a stripe for the contrast fabric. I think it makes it look a little more formal than if we had used a plaid or other small print. Lastly, the finishing touch on this treatment is the cording detail around the top and bottom. Cutting the stripe on the bias makes the cording stands out, and outlines the valance nicely. The pillows in the bedding also used the stripe cut on the bias. This gives unity to the room.
Tuesday, June 12, 2012
Monday, June 11, 2012
The Farm
My parent's farm is the place I call home, even though I haven't lived there since I was 23. I know I am fortunate to be able to go back there, and experience it almost as it was 25 years ago: The house is still spotless. The garden is still well-tended. The food is still delicious. The cattle are still fat and peaceful. About the only thing that has changed is the appliances in the kitchen and the tobacco-free pasture across the road. My parents still take incredible care of their 150+ acres and 150 year-old home - better than most of us take care of our almost new houses and quarter-acre lots. Their garden provides produce for the two of them, their children and grandchildren, and many others in their community. They still mow almost three acres of yard every week in the summer. Daddy still has over 100 head of cattle that he cares for and sells for a profit. Many people count on him for fixing up their tractors when they are broken and an her for fixing a casserole when their is a death in the church. Yes, I know I am blessed. And I don't take it lightly.
Yesterday, we got together and celebrated Father's Day a little early. Most everyone was there, including sons-in-law, grandchildren, and the first great-granddaughter. The following are some pictures I took while on a walk before lunch.
Friday, June 8, 2012
Dining Room - Before and After
Getting a good picture of a window treatment is so difficult. In the first place, if it is a sunny day, you are aiming the camera at the window and directly into the sun. Because of the light outside, you need a flash inside to try and capture the window treatment. But that leads to another problem: the flash reflects off the glass of the window and you get a bright spot where one should not be. At my installations yesterday, I took almost 100 pictures, and got maybe three that were good enough without any editing. My installer, Ron, laughs at me for taking so many pictures, but AHHHHHHHH IT IS SO FRUSTRATING!!!
So, here are a few that came out okay (with a little help from my best friend, Photoshop)
So, here are a few that came out okay (with a little help from my best friend, Photoshop)
BEFORE - Beautiful Plantation Blinds, but no color to liven things up....
......and AFTER - Great color choices in fabric and hardware by my client. The chandelier is beautiful in the room, but it got right in the way of my picture! Next time, I'll shoot straight instead of at an angle.
I know I sound like a broken record, but a well-done window treatment makes a room complete. It's like having just the right jewelry for an outfit - you don't have to have it, but boy do you feel put together when you do!
Thursday, June 7, 2012
The Beauty of Solar Shades
I like the look of Solar Shades. They are pretty and functional. These were installed a few weeks ago in a newly remodeled kitchen.
The headers on these shades are encased in a cassette. It gives them some weight at the top without being too cumbersome. I like this look so much more than the typical detachable valance that usually comes with a wood blind. And when they are fully raised, the blind disappears into the cassette, so the stack-up is nice and tight.
Because there are young children in this household, it was important for my client to be able to see outside even when the shades are down. This picture shows the opacity of the shades. As you can see, it was a sunny day when these were taken, but there is little to no sun coming in. In this way, the furniture is as well protected as the kids!
Wednesday, June 6, 2012
I started sewing when I was about 12 years old. My first creation was a skirt. I remember spending lots of time trying to get that darn zipper in just right. Next, I entered a 4-H (does that even still exist?) contest where I tried a skirt with a matching vest. It was pink - kind of a Pepto Bismol color. Man, was I proud of that creation! I took it to the Madison County Fair, and won a ribbon, if I remember correctly. Okay, it was honorable mention, but I was proud of it none-the-less. I wish I still had the picture of myself wearing that crazy outfit with my buck teeth and shag haircut.
When I was a teenager, my favorite store to go to was Faye's Fabrics in Richmond Ky. I loved looking at all the fabrics, patterns, and especially the buttons. I loved pouring over the new pattern books that came out seasonally, and picking out just the right fabric for the pattern. Occasionally, Faye would give me her outdated pattern book to take home and look through. That was more fun for me than any Seventeen Magizine ever could be. Hours and hours of my growing-up years were spent on the floor of my mother's dining room cutting out a new pattern, and seaming it together using her sewing machine. When I was first learning to sew, I would seam two pieces together, then take it to her for inspection. She was usually in the family room in her favorite chair grading papers. (She was a teacher) Many is the time that I had to take out a row of stitching, and redo it so that it was up to her standards.
In college, I made several dresses for myself and for friends. That was my first taste of being paid for what I love to do. My graduation present from college was my own sewing machine! What a different time we live in now.....
My business that I love so much, Sycamore Creek Interiors, was born out of those early years of sewing. So much of what I learned back then, I use every time I have a sewing project. Things like pressing open a seam to make it lay better, and adding an inch to the finished size of a pillow to account for the seam allowance.
I've been thinking for a while that it is such a shame that the art of sewing for your family has all but died out. Not many people know how to make a skirt for themselves anymore, much less anything pretty for their home. It's so easy to buy the clothing we need from our favorite online sight or store. But a hand-made gift for a new baby, or a special Easter dress for a child, or some new pillows for your living room that just match your window treatments is a special thing, and something I wish I could pass down to the next generation.
Monday, June 4, 2012
Today's project involved combining several techniques that I had not done before......I paired a simple cornice with an inverted pleat valance. I think it turned out pretty well! This was also a chance for me to play with the settings on my camera, and pretty each picture up when necessary using Photoshop.
Step 1: The wood frame was already constructed by my client. I wrapped it with Cornice padding.
Step 2: The Cornice was covered with the face fabric supplied by my client.
Step 3: Contrasting cording was added to the top and bottom.
Step 4: The top of the cornice was covered with a coordinating fabric. This gives a nice finished top, in case the cornice can be seen from the top.
Step 5. The face fabric, pleat fabric and lining fabric for the inverted pleat valance was cut and measured to create the pleats.
Step 6. The fabric was seamed and and pleated together. Then, the lining was attached.
Step 7. The inverted pleat shape was temporarily folded into place just to check pattern placement.
Step 8. The inverted pleat valance was then attached to the cornice.
Step 9. Lining was added to the back of the cornice. It's important that the front of the treatment looks as good as the back.
Step 10. The finished treatment is inspected, packaged, and is ready for delivery to the client's home.
Monday, January 16, 2012
Happy 2012!
Just finished up my first job of 2012.....beautiful flat roman shades in a plaid silk. These went in a dining room that had existing panels in the same silk. Just the finishing touch for this homeowner's windows.
Subscribe to:
Comments (Atom)
Welcome Home


